Using Snip & Sketch is very convenient, and you can open it with a simple hotkey shortcut.
Open Snip & Sketch
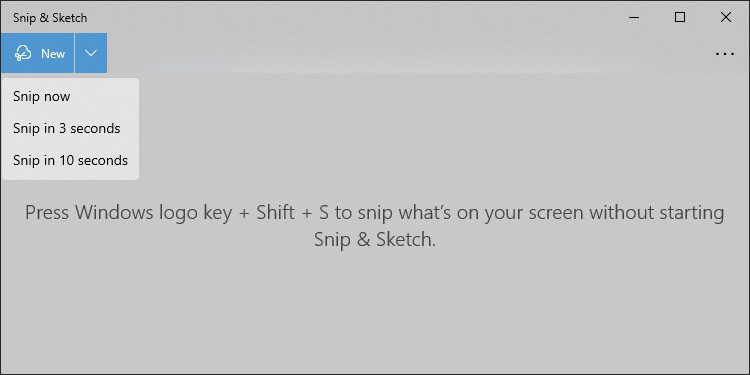
The usual method of opening Snip & Sketch is from the Start Menu. You can also search for it on the search bar. Clicking New on the app takes you to the snipping screen, where you can take your screenshots. The downwards arrow icon also shows the options to take a snip now or after 3 or 10 seconds. After clicking New, the screen dims, and you can see the snipping toolbar on the top of your screen. There are also a few shortcuts to access the snipping screen directly. They are as follows:
Pressing Win + Shift + S.Pressing PrtScr or Print Screen button.First, you need to go to Settings > Ease of Access > Keyboard and enable the Print Screen shortcut.Using the Run command explorer ms-screenclip:Clicking the Notification icon and selecting Screen snip or Expand > Screen Snip.
Take Screenshots with Snip & Sketch
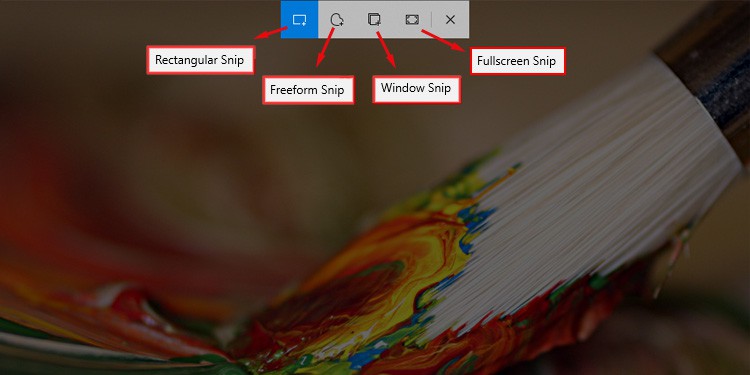
Snip & Sketch offers four screenshot modes. You can select the following modes from the snip screen toolbar:
Rectangular Snip: This mode captures the image of a custom rectangular area. You need to click and drag your mouse to select the area along the diagonal of the rectangle.Freeform Snip: Freeform snip captures the image of a custom irregular zone. You need to click and drag your mouse over the perimeter of the screenshot boundary.Window Snip: In this mode, you can capture a single window. Click inside the window to take its screenshot.Full-screen Snip: As the name suggests, Fullscreen snip captures the entire screen image. Click anywhere except the toolbar to take the screenshot.
Edit Screenshots with Snip & Sketch
After taking a screenshot, Snip & Sketch takes you to the editing window. But if you used the snip screen shortcuts, taking a screenshot only gives a notification. You need to click the notification to edit the image. Here are the editing options that Snip & Sketch offers:
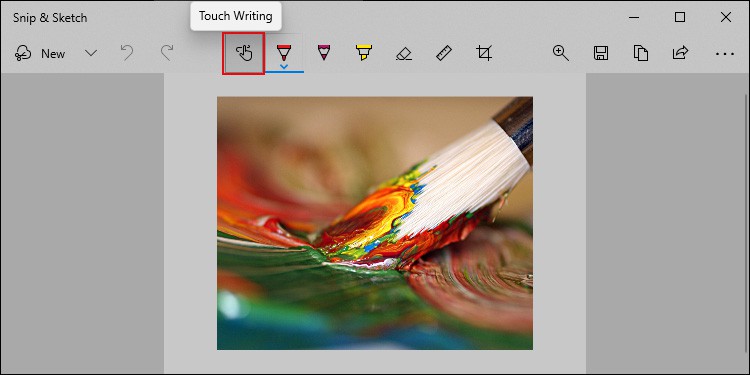
Touch Write
Touch Writing allows you to edit by using the touchscreen. You can also press Alt + T to toggle Touch Writing.
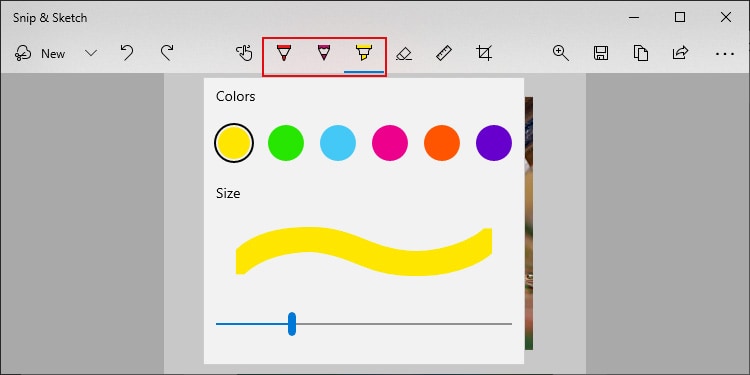
Annotate
It is the option to write or mark on your screenshot. There are three tools you can use to annotate the image, which are:
Ballpoint Pen (Alt + B)Pencil (Alt + I)Highlighter (Alt + H)
You can choose the color and size of the tools by right-clicking on them.
Erase
The Eraser deletes the annotations you have made. You can also use the Alt + E shortcut to pick this tool. Right-clicking on the Eraser gives the option Erase all ink. Selecting it removes all annotations on the image.
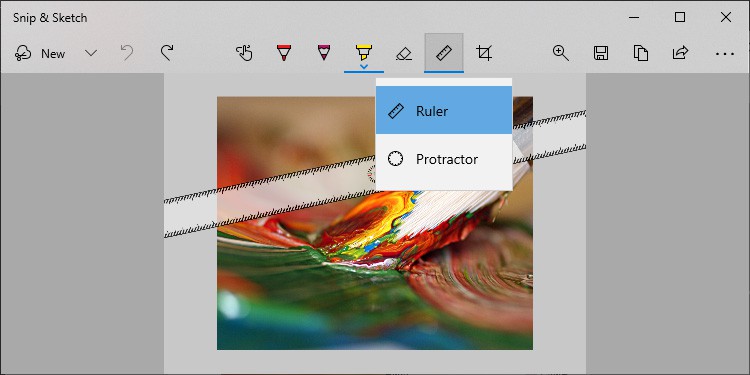
Ruler or Protractor
Clicking the Ruler or the protractor icon shows the corresponding tool on the window. You can select which tool to use by right-clicking on the icon. You can use these tools to draw a straight or circular annotation. Also, clicking on Ruler or Protractor again removes the tool. Clicking and dragging the Ruler or the Protractor moves them around the window. Also, you can change the size of the Protractor and rotate the Ruler by using the mouse scroll wheel. If you use a touchpad, drag two fingers on it vertically to execute a similar process.
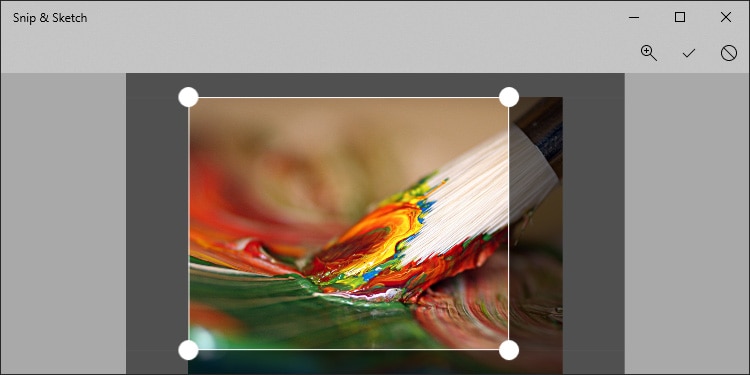
Crop
You can also crop the screenshot by pressing Alt + R or clicking on the Crop icon. You need to drag the corner circles to set the crop size. Also, click inside the crop area and drag it around to move it.
Magnify
You can also magnify the image. However, navigating the magnified image is slightly troublesome. Scrolling on the mouse moves the vertical slider. But you can only click and drag the horizontal slider to move it. Still, it is a good option to make small edits on your screenshot. After pressing Alt + Z or clicking the Zoom icon, you can set the slider to magnify the image. We also have a detailed article on zooming in and out on windows. We are sure you’ll be amazed by a thing or two you learn new. Do let us know in the comments.
Other Options
There are also some other things you can do on the Snip and Sketch edit window, such as:
Undo (Ctrl + Z) and Redo (Ctrl + Y) modifications.Save (Ctrl + S), Copy (Ctrl + C) or Share (Alt + A) the screenshot.Open (Ctrl + O) any image to edit with Snip & Sketch.Print (Ctrl + P) the image.
You can also access its Settings from the triple-dot icon. You can set the relevant settings to make using Snip & Sketch more convenient for you.
Snip & Sketch Not Working
Sometimes you can’t take screenshots using the Snip & Sketch utility. In such cases, you usually can’t open this app. Look through and execute the following possible solutions to troubleshoot this issue:
Restart PC
Most of the time, this error results due to minor issues with your system. In such cases, a reboot is enough to fix the errors.
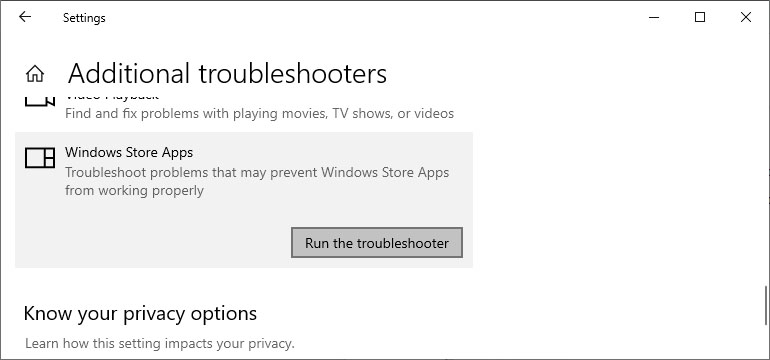
Run Windows Store Apps Troubleshooter
Snip & Sketch is a Microsoft Store app. You can use the Store Apps Troubleshooter to check and fix the errors within the app or the Store. To do so,
Reset Microsoft Store
You can also try resetting the Microsoft Windows Store if Snip & Sketch stops working. Enter wsreset on the Run dialog box to reset Store.
SFC and DISM
This issue may also occur due to the corruption of system files. You need to check and repair the files using SFC and DISM to resolve such issues. To do so,
Reset or Reinstall Snip & Sketch
If the problem is with the app itself, resetting it should fix the issue. Here’s how you can do so: If resetting can’t resolve the problem, uninstall this app using a similar method. Then, install it again from the Microsoft Store.
Related Questions
Can’t Get Any Notification After Taking a Screenshot
This happens if you have turned off the notification setting for Snip & Sketch. To turn it on: Also, it is possible to block notifications with the Focus assist feature. Head over to Settings > System > Focus assists and tick the Off option to allow notifications.