Depending on how far you sit from your monitor or laptop screen, you may wish to change the display scaling. Luckily, you can do so using Windows settings and from your GPU control panel too. So, if you’re unaware of this, we have brought this guide to help you know what display scaling is and how to configure it on Windows 11.
Are Display Scaling and Display Resolution the Same?
Display scaling and display resolution are two completely different terms. While the former means adjusting the content size based on pixels, the latter focuses on the number of pixels rendered on your display. Although they are different, scaling and resolution are interconnected and can drastically change how you view your screen. For example, in a display supporting the resolution of 1920 x 1080, the display scale of 150% is ideal. So, if you change the scale size to 125% or less, the size of screen content decreases, and setting it to 175% or more will increase the content size. Now, if you change your screen resolution to 1280 x 960 without changing the display scale (150%), your screen content feels like it has been zoomed in. This is mainly because this resolution’s recommended display scale is 125%. Basically, what happens here is that when decreasing the display resolution, the number of pixels on the screen is also minimized. On the other hand, there’s no change in pixel when increasing/decreasing display scaling; only the size changes depending on the resolution. Thus, it’s important to note that if you switch your screen to a different size and resolution, you must also configure the display scaling. This way, images, texts, and other elements become sharp and crisp, fixing your blurry computer screen.
When Should I Configure Display Scaling?
Display settings can come in handy when you’re using an external display. Let’s say you’re displaying your laptop content on a monitor. Undoubtedly, the screen size and resolution become completely different when you switch the display. So, you may notice that the text and image quality may drastically decrease. To solve this, you can adjust the display scaling, and things become much clearer. Moreover, you can also perform scaling on GPU other than just display.
How Can I Configure Display Scaling in Windows 11?
If you see your screen content smaller or feel like it’s zoomed in, it’s probably because the display scaling configuration isn’t right. So, it’s important that you change this setting to view screen objects better. Moreover, if you do not have a great vision, that’s alright! You can simply increase the display scale, and this way, you can prevent possible eye strain too. So, in this section, we will guide you to reconfigure display scaling on Windows 11.
Display Scaling From Windows Settings
Configuring display scaling is relatively easy on Windows. In fact, Microsoft provides a list of compatible scale percentages so that you can directly choose your desired one. Moreover, it syncs well with the screen resolution and automatically sets the recommended display scale. But, if you wish to reconfigure it, here’s the correct way to do it:
Set Custom Display Scaling From Windows Settings
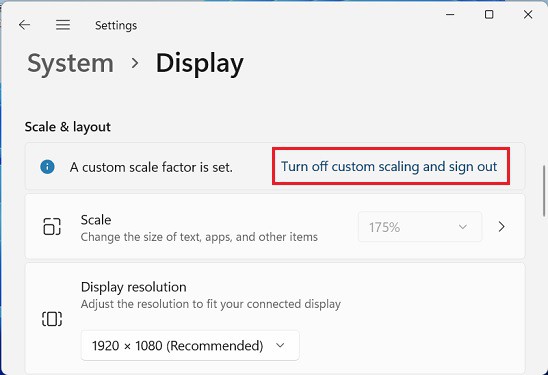
If you’re unsatisfied with the limited percentage on the Scale drop-down, there’s a way to set a custom display scaling on Windows Settings. For example, if you want to set the scale anywhere between 125% and 150%, say 140%, you can do that using the Custom scaling option: Once you’ve used the custom scaling size, the Scale drop-down is grayed out, meaning you can no longer choose a default setting. So, to revert the changes, here’s what you need to do:
Change High DPI Settings for a Particular Program
Few applications on your PC, like FPS games, require high DPI to run smoothly. In such a case, if you’ve set a relatively low display scaling on Windows settings, the objects inside that app may become blurry and difficult to access. So, we recommend enabling the High DPI Settings so that it fixes any scaling problems:
Choose Screen Scaling Mode in GPU Control Panel
Whether you have an integrated or dedicated graphics card, you can configure display scaling using their dedicated software. However, instead of setting the scale percentage, you’ll get to choose different Scaling modes here. In this section, we’ll be focusing on the necessary steps for doing so on the major GPU apps.
On Intel UHD Graphics Control Panel
If you have an Intel graphics card, the Intel UHD Graphics Control Panel should come built-in on your device. Here’s how you can configure display scaling using this application:
On AMD Radeon Software
If you have installed an AMD GPU on your motherboard, it’s easy to configure different screen scaling modes. For demonstration purposes, we’ve used the AMD Software: Adrenalin Edition in the steps below:
On Nvidia Control Panel
Like Intel UHD Graphics Control Panel and AMD Software, there’s an option to set Scaling Mode on NVIDIA Control Panel too. And here’s a detailed guide on how you can configure this:
Display Scaling in Multi-Screen Setup
If you have a multi-screen setup, you need to consider a few other things before setting the display scaling on Windows. Go through the below guide on what you should do: However, if you’re planning to set a scaling mode, you need to use the GPU control panel. For demonstration purposes, we have used the Intel UHD Graphics Control Panel in the below steps:


